As I write this Blog, I travel back in time to find how difficult it was as a student to acquire grasp on Pro/Toolkit. Even today, if I googled on "Pro/Toolkit", I will find some good links provided by PTC. There are few more helpful links on basics of Toolkit (though these sites will also warn you how hard it is to learn Pro/Toolkit). Trust me, you don't have to be a PhD or a programming geek to learn how to get things done using Pro/Toolkit. I have slogged it out but I want to make this mystery a little bit easier to comprehend for the new users and students.I am planning to start posting topics on Pro/Toolkit, J-link, C, etc. Remember the best place to learn these products are the PTC certified training centers. This blog is going to be a helpful link for the new users as well as for experienced users for quick reference. For all, there is no better place than the userguides provided by PTC to all its users.Please bookmark this page and comeback soon for more information.
The BIG Picture
PTC has offered a lot of solution for customizing Pro/ENGINEER. These include Pro/Toolkit, J-Link, Pro/Web.link and VB API’s (introduced in Wildfire 4.0). Pro/Toolkit has the largest set of API’s (more than 5000 API’s). Pro/Toolkit requires the developers to purchase the license. For J-link, Pro/Web.link and VB API’s there is no license requirement, so it is free to be used by everyone.I will touch all these topics in the blog. For the supported tools (compilers, Java versions, etc), please refer to the PTC’s platform support page. To start with I would like to show you how to get these tools installed on your workstation. While installing Wildfire 4.0, we will find an option to install the “API Toolkits”.
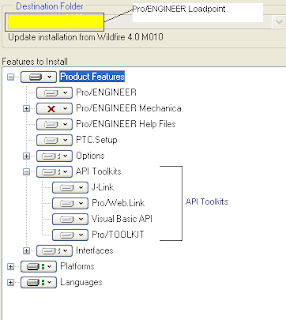
Please refer to the attached image above. To work on these tools we will have to install them on the workstation. We may choose the Pro/ENGINEER loadpoint or let the installer create it for us (Eg. D:\PTC\Wildfire4) and the entire Pro/ENGINEER directories will be installed inside that folder. The contents of these folders are as follows
Pro/Toolkit Directory structure

The parent Pro/Toolkit directory has the following directories listed under it
1. ) “i486_nt” folder which includes the makefiles, all the Library files (used for linking), and few DLL files (compiled Pro/Toolkit example files). This directory also includes two EXE files (prodialog_view.exe and ptk_revtool.exe), which are utility files for dialog view and revision tool. I will be discussing more about these in the subsequent blogs.
2.) “includes” folder has all the header files required for Pro/Toolkit. Remember you may also be required to use some of the header files from the Pro/Develop*.
3.) “protk_appls” is the folder which has the sample codes for most of the Pro/Toolkit API’s. These sample application files can be compiled using the makefiles available from the above “i486_nt” folder. This folder also has some application specific header files and model files.
4.) “protkdoc” folder has the documentation for ALL the API’s and the user guide. It is a good idea to create a shortcut for the “index.html” on the desktop as we have to refer to the documentation quite often.
5.) There are few more files in the parent Pro/Toolkit folder:
- a.) protk.dat – this file is used to register a synchronous Toolkit application in Pro/ENGINEER.
- b.) Protookit_GSG.pdf – this file is the Getting started guide for Pro/Toolkit. All the new users MUST read through this guide as it is very useful for them. I will not cover anything which is already explained in this guide.
- c.) Protoolkit_Wildfire40_RelNotes.pdf – this file is the release note for the new version of Pro/Toolkit. It covers new functions, critical changes and miscellaneous changes to Pro/Toolkit.
- d.) tkuse.pdf – this is the userguide (manual) for Pro/Toolkit. For Wildfire 4.0, this document has more than 2000 pages and tons of information.
- e.) README – this file has helpful information about Pro/Toolkit installation and use.
Pro/Develop* Directory structure
 The parent Pro/Develop directory has the following directories listed under it
1.) “i486_nt” folder which includes the makefiles, all the Library files (used for linking), and few DLL files (compiled Pro/Toolkit example files).
2.) “includes” folder has all the header files required for Pro/Toolkit.
3.) “prodev_appls” has the sample applications. It also contains the application specific include files and model files.
4.) The parent Pro/Develop directory also has the prodev.dat file which is used to register the Pro/Develop application in Pro/ENGINEER.
J-Link Directory structure
 J-Link is a Java language toolkit to access the internal components of Pro/ENGINEER session. J-Link is free for Pro/ENGINEER but it has a subset of all the functions available in Pro/Toolkit. J-Link allows user to create platform independent applications. You have to be an experienced Pro/ENGINEER user also proficient in Core Java to use this tool.
The parent J-Link directory has the following directories listed under it
1.) “jlink_appls” folder has sample application showing the use of the methods.
2.) “jlink_tutorial” has the sample tutorials and the solutions folder. There are guidelines to complete these tutorials at the PTC knowledgebase on the website.
3.) “jlinkdoc” folder has the documentation for ALL the Java methods and the user guide. It is a good idea to create a shortcut for the “index.html” on the desktop as we have to refer to the documentation quite often.
4.) There are few more files in the parent J-Link folder:
- a.) Jlink_Wildfire40_RelNotes.pdf – this file has the release note for the new version of J-Link. It covers new methods and any critical changes in the new release.
- b.) jlinkug.pdf – this is the userguide (manual) for J-Link.
- c.) README – this file has helpful information about J-Link installation and use.
 Pro/Web.Link is JavaScript toolkit to access the internal components of Pro/ENGINEER session. It is a tool that links the World Wide Web to Pro/ENGINEER. It is useful in managing. You have to be an experienced Pro/ENGINEER user and also a proficient user of JavaScript to use this tool.
The parent Pro/Web.Link directory has the following directories listed under it
1.) “weblinkdoc” folder has the documentation about Pro/Web.Link. It is a good idea to create a shortcut for the “index.html” on the desktop as we have to refer to the documentation quite often.
2.) “weblinkexamples” folder has all sample applications on Pro/Web.Link.
3.) There are few more files in the parent Pro/Web.Link folder:
- a.) README – this file has helpful information about Pro/Web.Link installation and use.
- b.) Weblink_Wildfire40_RelNotes.pdf – this file has the release note for the new version of Pro/Web.Link. It covers new methods and any critical changes in the new release
- c.) Weblinkug.pdf – this is the userguide for Pro/Web.Link users.
VB API Directory structure
 This tool is introduced in Wildfire 4.0. VB API is the Visual Basic toolkit to access the internal components of Pro/ENGINEER session. You have to be an experienced Pro/ENGINEER user who is also familiar with Visual Basic or another object-oriented language. Visual Basic .NET 2005 is the certified platform for this release.
The parent VB API directory has the following directories listed under it
1.) “vbapi_appls” contains an project on Pro/ENGINEER parameters.
2.) “vbapi_examples” folder has many sample applications on VB API use.
3.) “vbapidoc” folder has the documentation about VB API. It is a good idea to create a shortcut for the “index.html” on the desktop as we have to refer to the documentation quite often.There is one more files in the parent VB API folder:
- a.) Vbug.pdf – this file is the userguide for the VB API users. It covers the VB API for Pro/ENGINEER in about 350 pages of document.
_____________________________________________________________
In this blog entry I have introduced you to the various options available for customizing Pro/ENGINEER. In the next few blogs I will try to cover each of these options one by one. The flow will be from Pro/Toolkit to J-Link to Pro/Web.Link to VB API. I hope that you will find this information useful. You may subscribe to my blog using the form on the main page and get the update as and when it happens. Please let me know if the information in the blog was helpful to you or not. Also, leave me comments on various technical and non-technical aspects on how to improve this blog. I will be glad to incorporate any good suggestion. I will be posting my first blog on Pro/Toolkit shortly, stay tuned.
__________________________________________________________________In this blog entry I have introduced you to the various options available for customizing Pro/ENGINEER. In the next few blogs I will try to cover each of these options one by one. The flow will be from Pro/Toolkit to J-Link to Pro/Web.Link to VB API. I hope that you will find this information useful. You may subscribe to my blog using the form on the main page and get the update as and when it happens. Please let me know if the information in the blog was helpful to you or not. Also, leave me comments on various technical and non-technical aspects on how to improve this blog. I will be glad to incorporate any good suggestion. I will be posting my first blog on Pro/Toolkit shortly, stay tuned.
TRADEMARKS: Pro/ENGINEER, Wildfire, Pro/Toolkit, Pro/Develop, J-Link, Pro/Web.Link and VB API are the registered trademarks of PTC (http://www.ptc.com/). All other products or services mentioned in this blog are the trademarks or service marks of their respective companies or organizations.
Nuts and Bolts
In this and few subsequent blogs, I would like to introduce Pro/Toolkit. It will be a helpful guide for the new users, experienced user may skip this section. Throughout this series of blog I will be using a Windows XP machine and my compiler will be Visual Studio. To keep it simple in the beginning, I will compile my Pro/Toolkit applications using the command line arguments of the VC compiler. For UNIX users, I would like to help them by emails if they have any specific requirement. You will be required to keep the index.html (APIWizard) started from the (ProENGINEER_LOADPOINT)\protoolkit\protkdoc folder.
To begin with, new Pro/Toolkit users must know some key stuff as listed below:
Pro/Develop - This was the customization tool used in Pro/ENGINEER till Pro/Toolkit replaced it in the Release 17 of Pro/ENGINEER. Though, we have a better product in Pro/Toolkit, we may still use Pro/Develop to build our application. In fact, there are few areas where there is no equivalent Pro/Toolkit function and we are required to use Pro/Develop functions. Both Pro/Toolkit and Pro/Develop uses the same mechanism to connect to Pro/ENGINEER, so in a single application we may have a mix of both these products.
protk.dat file - This is the file which registers a pro/Toolkit application in Pro/ENGINEER. It is a text file with .dat extension for Pro/ENGINEER to recognize and register the application. I will be taking a closer look at this file later on.
Environment variables: There are few environment variables required to be set for asynchronous application but for synchronous application no additional environment variables are required to be set. The environment variable "PRO_COMM_MSG_EXE" should point to "(ProENGINEER_LOADPOINT)/obj/pro_comm_msg.exe" file. The other environment variables like Pro/ENGINEER path, etc are already set when installing Pro/ENGINEER. Some special environment variables are required for J-link, which we will cover when we touch that topic.
Synchronous Application: This is the mode of Pro/Toolkit when the application is registered in Pro/ENGINEER and is controlled by the Pro/ENGINEER session. This application has no main () function but two mandatory function called user_initialize () and user_terminate (). The function user_initialize () is the first function to be visited when the application is being called from Pro/ENGINEER. Standalone synchronous application is not feasible as it has no main () function and it dependent on Pro/ENGINEER session to make calls to it. There are two ways of creating a synchronous application; Spawn mode and DLL mode.
- Spawn mode: In this mode the executable file interacts with the Pro/ENGINEER process (xtop.exe) using Inter Process Communication (IPC). This mode is slower as compared with the DLL mode but while developing an application, this mode is recommended as it is easier to debug a smaller application.
- DLL mode: In this mode the executable (DLL file) gets embedded inside the Pro/ENGINEER process (xtop.exe), while it launches. This mode is much faster than the spawn mode. This mode should be used when the application has to be released for the end users.
Asynchronous Application: In this mode, the executable file has its own main () function. Which means it can exist independently. In this mode the application makes a call either to connect to an existing Pro/ENGINEER session or to start a new Pro/ENGINEER session. In this mode the Pro/ENGINEER process (xtop.exe) and application perform operations concurrently. There are two forms of Asynchronous application; Simple Asynchronous Mode and Full Asynchronous Mode.
- Simple Asynchronous Mode: In this mode there is no implementation in the application to handle the request from Pro/ENGINEER. So, any event (user click, feature failure etc) will not be passed on to the application to react to it. This application can start/connect to Pro/ENGINEER session and ask Pro/ENGINEER to perform some tasks and then disconnect/end Pro/ENGINEER session. None of the functions of the applications can be invoked by Pro/ENGINEER.
- Full Asynchronous Mode: In this mode, there is a mechanism to handle the requests from Pro/ENGINEER. In this mode, the application has to implement a control loop that waits for messages from Pro/ENGINEER. In this mode, Pro/ENGINEER can call functions in the application also the application can react to events in Pro/ENGINEER.
MSVC Vs Command prompt: There are two different ways by which we can compile and create an executable file in Pro/Toolkit. The first way is to create a project in Visual Studio and then compile the code. Though this mode is very user friendly, it could become a daunting task for the new users to learn Pro/Toolkit as well as the operations of the Visual studio. For setting up the Visual studio project, please read the chapter 2 of Getting started guide of Pro/Toolkit in the Wildfire 4.0 installation directory (Protoolkit_GSG.pdf). If you have prior experience in Visual studio I would highly recommend it. Otherwise for a new user it would be better if we follow the command prompt way of compiling to start with and then moving on to Visual Studio. In the command prompt mode we normally set the environment variables of the VC compiler in the command window and then compile our code with the "nmake" option. I will cover how we can set up the environment variables of the VC compiler and compile a Pro/Toolkit application. I would encourage all to use the make files supplied by PTC. Throughout this blog I will use the PTC's makefiles to compile my applications.
Makefile: I will be covering the Makefile in more details later on. For the time being you may consider a make file as an instruction file for the compiler about the various compiler flags to be set while compiling and linking the application to the Pro/ENGINEER libraries.
________________________________________________________
These are the few concepts/terms which should help new users to accelerate their learning. Again, do let me know if you find this blog interesting, do leave me a comment; I will be happy to interact with you. I am signing off for now.
_________________________________________________________
TRADEMARKS: Pro/ENGINEER, Wildfire, Pro/Toolkit, Pro/Develop, J-Link, Pro/Web.Link and VB API are the registered trademarks of PTC (http://www.ptc.com/). All other products or services mentioned in this blog are the trademarks or service marks of their respective companies or organizations.
Getting Started
In this section we will build a skeleton synchronous Pro/Toolkit application from the scratch. You should have a compiler to compile code. In this example I will be using the Microsoft Visual C++ 6 and Pro/ENGINEER Wildfire 2.0. I will use the command prompt for compiling the code with the help of PTC provided standard make files. Create a folder and copy the "make_basic" file from the "[TK_LOADPOINT]/ [MACHINE]/obj" folder. Now open the file with any text editor and edit the text in the file as shown below:
~~~~~~~~~~~~~~~~~~~~
Line#23 -->> EXE = pt_basic.exe change it to EXE = tkapp.exe ( we will call our application "tkapp")
Line#24 -->> EXE_DLL = pt_basic.dll change it to EXE_DLL = tkapp.dll
Line#27 -->> PROTOOL_SRC = ../../../protoolkit change it to PROTOOL_SRC = [PROE_LOADPOINT]/protoolkit (this is required for the compiler to know the location of the library file and the include files of Pro/Toolkit)
Line#29 -->> PRODEV_SRC = ../../../prodevelop change it to PRODEV_SRC = [PROE_LOADPOINT]/prodevelop (this is required for the compiler to know the location of the library file and the include files of Pro/Develop)
Line#73 -->> OBJS = pt_basic_src.obj pt_utils.obj change it to OBJS = tkapp.obj (we indicate that there will be an intermediate file with the name tkapp.obj created)
Line#94 -->> pt_basic_src.obj: $(PROTK_APPLS)/pt_basic/pt_basic_src/pt_basic_src.c
$(CC) $(CFLAGS) $(PROTK_APPLS)/pt_basic/pt_basic_src/pt_basic_src.c change it to tkapp_src.obj: tkapp.c
Remove the line starting with "pt_utils.obj" completely.
~~~~~~~~~~~~~~~~~~~~
Save the file and exit the editor. Now the second task is to get the source code going. To start with, we will write a small program in Pro/Toolkit. As mentioned in my previous blog, for a synchronous application the requirement is to have a user_initialize() and a user_terminate() function. We will open a text editor again and write the code as shown below (The name of the code file should be tkapp.c):
~~~~~~~~~~~~~~~~~~~~
#include "ProToolkit.h" // This include file is a must
/********************************/
int user_initialize() // This is a must for sync applications
{
/********************************/
int user_initialize() // This is a must for sync applications
{
printf("\nHello Pro/Toolkit World !!\n");
return (0);
}
/********************************/
void user_terminate() // This is a must for sync applications
{
printf("\nGoodbye !!\n");
return (0);
}
/********************************/
void user_terminate() // This is a must for sync applications
{
printf("\nGoodbye !!\n");
}
~~~~~~~~~~~~~~~~~~~~
Save the file as tkapp.c in the same directory which was created in step 1. Open a command prompt and then go to the directory which was created in step 1. At this point you will have to set the environment for using Microsoft Visual C++ tools on the command window. You will type something like this on the command prompt "C:\Program Files\Microsoft Visual Studio\VC98\Bin\VCVARS32.bat" (The path could vary if you have the "Microsoft Visual Studio", installed on a different folder). After running this batch file (VCVARS32.bat), you will get a system message as “Setting environment for using Microsoft Visual C++ tools.”
Once the environment is set in the command prompt, we will compile the program “tkapp.c” by using the namke function, we will type “nmake -f make_basic”. This is going to compile the program and give us the “tkapp.exe” which is our first executable Pro/Toolkit application. Please refer to the command line snapshot below for more details.

Once the environment is set in the command prompt, we will compile the program “tkapp.c” by using the namke function, we will type “nmake -f make_basic”. This is going to compile the program and give us the “tkapp.exe” which is our first executable Pro/Toolkit application. Please refer to the command line snapshot below for more details.
Once the application is ready we will have to just make a protk.dat file to register the application in Pro/ENGINEER. The protk.dat file is a text file which has .dat extension for Pro/ENGINEER to recognize and register the Pro/Toolkit application. I am pasting the contents of the protk.dat file for the above application below:
~~~~~~~~~~~~~~~~~~~~
name tkapp
Startup exe
Allow_stop True
Delay_start False
exec_file tkapp.exe
text_dir .
END
~~~~~~~~~~~~~~~~~~~~
name tkapp
Startup exe
Allow_stop True
Delay_start False
exec_file tkapp.exe
text_dir .
END
~~~~~~~~~~~~~~~~~~~~
For details about the contents of the protk.dat file please refer to PTC guide for Pro/Toolkit (tkuse.pdf). After having the protk.dat file you may launch Pro/ENGINEER from the same directory and get the application running as shown in the snapshot below:

___________________________________________________________________
This is a skeleton application to have us up and running. The subsequent blog entries will deal with more complex features of Pro/Toolkit. I hope that all the readers will be able to follow the steps and complete the application as suggested in this blog. Please feel free to write to me and I will be glad to answer. Do subscribe to this blog and get updates as and when it happens. I will be posting the entries on regular intervals, do leave me a comment; I will be happy to interact with you. In case you require the source code and other files from this application, feel free to write to me at Alxn.Page@gmail.com. Thanks for your valuable time in reading through…. Bye for now, God Bless!!
_________________________________________________________
TRADEMARKS: Pro/ENGINEER, Wildfire, Pro/Toolkit, Pro/Develop, J-Link, Pro/Web.Link and VB API are the registered trademarks of PTC (http://www.ptc.com/). All other products or services mentioned in this blog are the trademarks or service marks of their respective companies or organizations.
Synchronous Application
In the last blog entry we saw a skeleton program which starts as soon as Pro/ENGINEER starts. The two functions user_initialize () and user_terminate () are called in succession. In a synchronous application the user_initialize () function is the first function to be which gets called and once it is complete, the user_terminate () function is called. We may put all our functions under user_initialize (). Please look at the API wizard for more details about the user_initialize () and the user_terminate () functions. API wizard is the best friend that any Pro/Toolkit developer can have.
We will build upon a skeleton model to craft our next application. The next application is going to write the mass properties of any model into the current working directory. The API we are going to use will be ProSolidMassPropertyGet (). For this application we will also create a menu which is going to invoke the Pro/Toolkit application. For creating the menu button we will be using the API’s ProCmdActionAdd () and ProMenubarmenuPushbuttonAdd (). Refer to the API wizard for more details about the API’s.
In this code we will be extracting the mass property information of any model. The source file should be named as “tkapp.c” and the same process of compiling the code and executing the application as mentioned in my previous post. In the application there will be the #TKButton on the #File menu to execute the application.
~~~~~~~~~~~~~~~~~~~~~~~~~~~~~~~~
/********************************
Pro/Toolkit Includes files
*********************************/
#include "ProToolkit.h"
#include "ProFeature.h"
#include "ProElemId.h"
#include "ProExtrude.h"
#include "ProModFeat.h"
#include "ProStdSection.h"
#include "ProElement.h"
#include "ProElempath.h"
#include "ProFeatType.h"
#include "ProFeatForm.h"
#include "ProSelection.h"
#include "ProSection.h"
#include "ProMenu.h"
#include "ProMenuBar.h"
#include "ProUtil.h"
#include "ProSolid.h"
#include "ProDtmCsys.h"
/********************************
Global definitions
*********************************/
static ProError status;
static wchar_t MSGFIL[] = {'f','i','l','e','.','t','x','t','\0'};
/********************************
Constructors
*********************************/
int call_back ();
int write_display(ProMassProperty );
/********************************
Access function Start - This function determines whether the button created in the application should be visible in Pro/ENGINEER or not
*********************************/
static uiCmdAccessState TestAccessDefault (uiCmdAccessMode access_mode)
{
ProMode mode;
ProModeCurrentGet( &mode );
if ( mode == PRO_MODE_PART
mode == PRO_MODE_COMPOSITE
mode == PRO_MODE_SHEET_METAL
mode == PRO_MODE_ASSEMBLY
)
return ACCESS_AVAILABLE;
return ACCESS_INVISIBLE;
}
/********************************
user_initialize Function - In this section a menu button is created and which has an call back action
*********************************/
int user_initialize()
{
uiCmdCmdId cmd_id;
status=ProCmdActionAdd("TKButton", (uiCmdCmdActFn) call_back, uiProe2ndImmediate,TestAccessDefault, PRO_B_TRUE, PRO_B_TRUE, &cmd_id);
status = ProMenubarmenuPushbuttonAdd("File", "TKButton", "TKButton", "TKButton","File.psh_rename", PRO_B_TRUE, cmd_id,MSGFIL);
return (0);
}
/********************************
call_back Function Start - This is the call back function which is getting called when the TKButton menu is pressed. All the action happend here.
*********************************/
int call_back ()
{
ProMdl model;
ProSolid solid;
ProName name;
ProCharName cname;
ProSelection *sel;
int n_sel;
ProModelitem modelitem;
ProMassProperty mass_prop;
ProCsys p_csys;
ProName csys_name;
status = ProMdlCurrentGet((ProMdl)&solid);
if(status)
{
print_s("The model could not be retrieved");
}
status = ProSelect("csys",1,NULL,NULL,NULL,NULL,&sel,&n_sel);
if(status)
{
return 0;
}
status = ProSelectionModelitemGet(sel[0], &modelitem);
status = ProModelitemNameGet(&modelitem,csys_name);
status = ProSolidMassPropertyGet(solid,csys_name, &mass_prop);
write_display(mass_prop);// File output Function called
return(0);
}
/********************************
File write and display Function Start
*********************************/
int write_display(ProMassProperty massprop)
{
FILE *fp;
ProName w_filename;
ProInfoWindowLocation win_location = { 0.5, 0.2 };
ProInfoWindowSize win_size = { 15, 80 };
char *fname = "output.txt";
fp = fopen (fname, "w"); /* Any command in between fopen and fprintf results in compiler error*/
fprintf(fp, "\nThe mass and volume of the part");
fprintf(fp, "\nMass = %f and Volume = %f ", massprop.mass, massprop.volume);
fprintf(fp, "\nCenter of gravity with respect to the selected CSYS");
fprintf(fp, "\nX Y Z %f %f %f \n", massprop.center_of_gravity[0], massprop.center_of_gravity[1], massprop.center_of_gravity[2]);
fclose(fp); /* important Point, close the file before using "ProInfoWindowDisplay", or it will print nothing*/
// Displaying the information window in Pro/ENGINEER
ProStringToWstring(w_filename,"output.txt");
status = ProInfoWindowDisplay(w_filename,&win_location, &win_size );
return (0);
}
void user_terminate()
{
}
/* The text editor of blogger is very bad, please execuse my poor formatting of the code*/
~~~~~~~~~~~~~~~~~~~~~~~~~~~~~~~~
Handles: Handles as the name suggest is the way data is handled in Pro/Toolkit. There are two types of handled in Pro/Toolkit - Opaque handle and Data Handle. The Data Handle is defined as structure and access structure members we can use dot operator (.) or pointer (->). Examples of DH are ProModelitem, ProGeomitem, ProExtobj, ProFeature and ProProcstep. For more details about Data Structure in C please refer to the following link.
The second type of Handled is called Opaque handles. Opaque handles are the black box from which the data can be extracted by other supporting API’s. Examples of Opaque handles are ProSurface, ProEdge and ProCsys.
At this point I want to reiterate that the API Wizard will be the “Best Friend” of any Pro/Toolkit developer. Please make sure that you go through the API Wizard whenever you want to write any code. My next application will be an Asynchronous application in the next post. I will be posting the entries on regular intervals, do leave me a comment; I will be happy to interact with you. In case you require the source code and other files from this application, feel free to write to me at Alxn.Page@gmail.com. Thanks for your valuable time in reading through. Ciao...
_________________________________________________________
TRADEMARKS: Pro/ENGINEER, Wildfire, Pro/Toolkit, Pro/Develop, J-Link, Pro/Web.Link and VB API are the registered trademarks of PTC (http://www.ptc.com/). All other products or services mentioned in this blog are the trademarks or service marks of their respective companies or organizations.
Asynchronous Application
For a head start on Asynchronous applications, please read my previous post “Nuts and Bolts” or follow the link. I have given brief summary about the Asynchronous mode. For more details refer to the section “Asynchronous Mode” from the toolkit user guide.
It is very important for an asynchronous application to have the following environment variable set.
On Windows:
PRO_COMM_MSG_EXE = (ProENGINEER_LOADPOINT)\i486_nt\obj\pro_comm_msg.exe
On Unix:
% setenv PRO_COMM_MSG_EXE (ProENGINEER_LOADPOINT)//obj/pro_comm_msg
Here is an example of Simple Asynchronous application. It launches a Pro/ENGINEER session and then create a PART, saves it and then Displays it.
~~~~~~~~~~~~~~~~~~~~~~~~~~~~~~~~~~~~
/*************************************************\
This is an Asynchronous application which launches
a Pro/E session and then create a PART and save and
Display it. It also activates the window
\*************************************************/
/*************************************************\
Pro/Toolkit Includes files
\*************************************************/
#include "ProToolkit.h"
#include "user_tk_error.h"
#include "ProCore.h"
#include "ProMdl.h"
#include "ProObjects.h"
#include "ProSizeConst.h"
#include "ProUtil.h"
/*************************************************\
Main Function
\*************************************************/
int main( int argc, char *argv[] )
{
char *arg_ptr;
int w_id;
ProName part_name;
ProError status;
ProSolid p_part, model;
/*************************************************\
Pro/ENGINEER launched asynchronously
\*************************************************/
if ( argc == 3)
{
arg_ptr = argv[1];
status=ProEngineerStart(arg_ptr,"");
printf("\n\n*The ProEngineerStart status: %d",status );
}
else
{
printf("Use Syntex: toolkit\n"); /* make sure to use a unique name for the Pro/E part, everytime the application is launched*/
exit(1);
}
/*************************************************\
Set up the part name from the argument list.
\*************************************************/
arg_ptr = argv[2];
ProStringToWstring(part_name,arg_ptr);
/*************************************************\
Retrieve a part with that name.
\*************************************************/
status=ProSolidCreate (part_name, PRO_MDL_PART, &p_part);
if (status!=PRO_TK_NO_ERROR)
{
printf("\n\n* Failed to Create part %s", arg_ptr); /* If the part file name exist on the working folder, Pro/E will exit giving error*/
}
/*************************************************\
Save the part
\*************************************************/
status=ProMdlSave((ProMdl)p_part);
printf("\n\n*The ProMdlSave status: %d",status );
if (status!=PRO_TK_NO_ERROR)
{
ProEngineerEnd(); /* If there is a specials character(e.g.#^%~ ) in the model file name, Exit Pro/E */
}
/*************************************************\
Retrieve the model
\*************************************************/
status = ProMdlRetrieve(part_name, PRO_MDL_PART, &model); /*It neither displays the model nor makes it the current model*/
printf("\n\n*The ProMdlRetrieve status: %d",status );
/*************************************************\
Display the Model
\*************************************************/
status = ProMdlDisplay((ProMdl)model);
printf("\n\n*The ProMdlDisplay status: %d",status );
/*************************************************\
Activate the Model
\*************************************************/
status = ProMdlWindowGet(model, &w_id);
status = ProWindowActivate(w_id);
return(0);
}
/*************************************************\
End of Application
\*************************************************/
If you need any help in compiling and running this application please get in touch with me at Alxn.Page@gmail.com. Thanks for your valuable time in reading through…. Happy coding, God Bless.
_________________________________________________________
TRADEMARKS: Pro/ENGINEER, Wildfire, Pro/Toolkit, Pro/Develop, J-Link, Pro/Web.Link and VB API are the registered trademarks of PTC (http://www.ptc.com/). All other products or services mentioned in this blog are the trademarks or service marks of their respective companies or organizations.
It is very important for an asynchronous application to have the following environment variable set.
On Windows:
PRO_COMM_MSG_EXE = (ProENGINEER_LOADPOINT)\i486_nt\obj\pro_comm_msg.exe
On Unix:
% setenv PRO_COMM_MSG_EXE (ProENGINEER_LOADPOINT)/
Here is an example of Simple Asynchronous application. It launches a Pro/ENGINEER session and then create a PART, saves it and then Displays it.
~~~~~~~~~~~~~~~~~~~~~~~~~~~~~~~~~~~~
/*************************************************\
This is an Asynchronous application which launches
a Pro/E session and then create a PART and save and
Display it. It also activates the window
\*************************************************/
/*************************************************\
Pro/Toolkit Includes files
\*************************************************/
#include "ProToolkit.h"
#include "user_tk_error.h"
#include "ProCore.h"
#include "ProMdl.h"
#include "ProObjects.h"
#include "ProSizeConst.h"
#include "ProUtil.h"
/*************************************************\
Main Function
\*************************************************/
int main( int argc, char *argv[] )
{
char *arg_ptr;
int w_id;
ProName part_name;
ProError status;
ProSolid p_part, model;
/*************************************************\
Pro/ENGINEER launched asynchronously
\*************************************************/
if ( argc == 3)
{
arg_ptr = argv[1];
status=ProEngineerStart(arg_ptr,"");
printf("\n\n*The ProEngineerStart status: %d",status );
}
else
{
printf("Use Syntex: toolkit
exit(1);
}
/*************************************************\
Set up the part name from the argument list.
\*************************************************/
arg_ptr = argv[2];
ProStringToWstring(part_name,arg_ptr);
/*************************************************\
Retrieve a part with that name.
\*************************************************/
status=ProSolidCreate (part_name, PRO_MDL_PART, &p_part);
if (status!=PRO_TK_NO_ERROR)
{
printf("\n\n* Failed to Create part %s", arg_ptr); /* If the part file name exist on the working folder, Pro/E will exit giving error*/
}
/*************************************************\
Save the part
\*************************************************/
status=ProMdlSave((ProMdl)p_part);
printf("\n\n*The ProMdlSave status: %d",status );
if (status!=PRO_TK_NO_ERROR)
{
ProEngineerEnd(); /* If there is a specials character(e.g.#^%~ ) in the model file name, Exit Pro/E */
}
/*************************************************\
Retrieve the model
\*************************************************/
status = ProMdlRetrieve(part_name, PRO_MDL_PART, &model); /*It neither displays the model nor makes it the current model*/
printf("\n\n*The ProMdlRetrieve status: %d",status );
/*************************************************\
Display the Model
\*************************************************/
status = ProMdlDisplay((ProMdl)model);
printf("\n\n*The ProMdlDisplay status: %d",status );
/*************************************************\
Activate the Model
\*************************************************/
status = ProMdlWindowGet(model, &w_id);
status = ProWindowActivate(w_id);
return(0);
}
/*************************************************\
End of Application
\*************************************************/
If you need any help in compiling and running this application please get in touch with me at Alxn.Page@gmail.com. Thanks for your valuable time in reading through…. Happy coding, God Bless.
_________________________________________________________
TRADEMARKS: Pro/ENGINEER, Wildfire, Pro/Toolkit, Pro/Develop, J-Link, Pro/Web.Link and VB API are the registered trademarks of PTC (http://www.ptc.com/). All other products or services mentioned in this blog are the trademarks or service marks of their respective companies or organizations.
Subscribe to:
Posts (Atom)